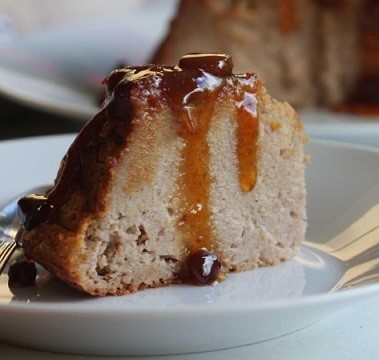
Preheat oven to 350. Grease a 9” x 13” pan or line muffin tins with papers.
Combine everything but nuts and raisins in a food processor or powerful blender. You can slightly cook carrots to make this go smoother but it’s not necessary. Blend until smooth and stir in nuts and raisins if using. Pour into pan or tins. Bake until center is set about 45 minutes.
Let cool. Cut into slices and serve topped with pure maple syrup, nut butter, honey or fresh fruit. Store in refrigerator. Makes approx. 6 servings.
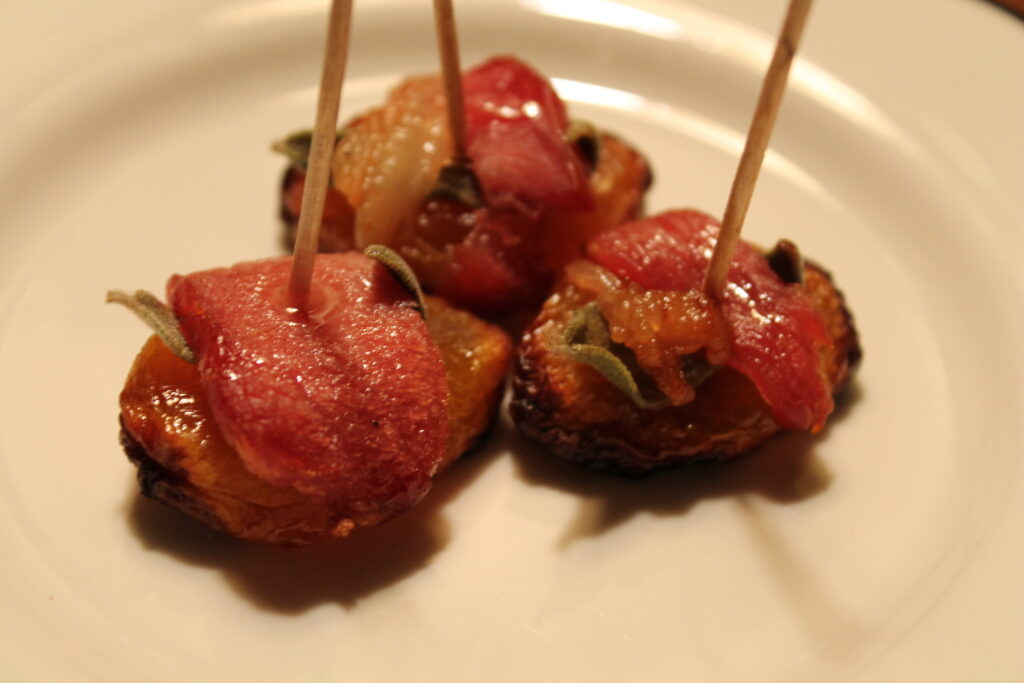
Preheat oven to 375º F. Place a sage leaf on each apricot and wrap with a piece of bacon with seam on bottom. Secure with a toothpick and place on baking sheet.
Bake until bacon has started to crisp, approximately 10 to 12 minutes.
Remove from oven and drizzle with pure maple syrup. Serve warm.
Measure flour, baking powder, salt, and baking soda into a large mixing bowl.
In a separate bowl, combine egg, buttermilk, brown sugar, and oil.
Pour wet ingredients into dry ingredients and stir just until moistened. Batter should be slightly lumpy. Let batter rest while you heat the pan.
Lightly spray or oil your griddle and preheat over medium heat. Pour ¼ cup of batter for each pancake onto hot griddle.
Flip the pancake when bubbles start to appear on the surface. Serve with warmed pure maple syrup.
How to Make Fun Pancake Shapes
Add 1 TB of milk or water to approximately 1/3 cup of batter and pour into a squirt bottle (a clean reused ketchup bottle works great). On a preheated skillet, draw the outline of the shape you’d like and let cook for about 20 seconds. Then fill in this outline with regular pancake batter and cook as usual.
Even easier: Use a large cookie cutter and cut out the middle of the pancake after it’s already cooked.
Would you like to make your own pure maple syrup? It’s much easier than you think! Click here for our How-To Library with everything you need to know.
Would you like to get new maple syrup recipes each week during tapping season? Click here to sign up for our newsletter and you’ll also get a FREE Quick Guide to Maple Tapping” ebook.
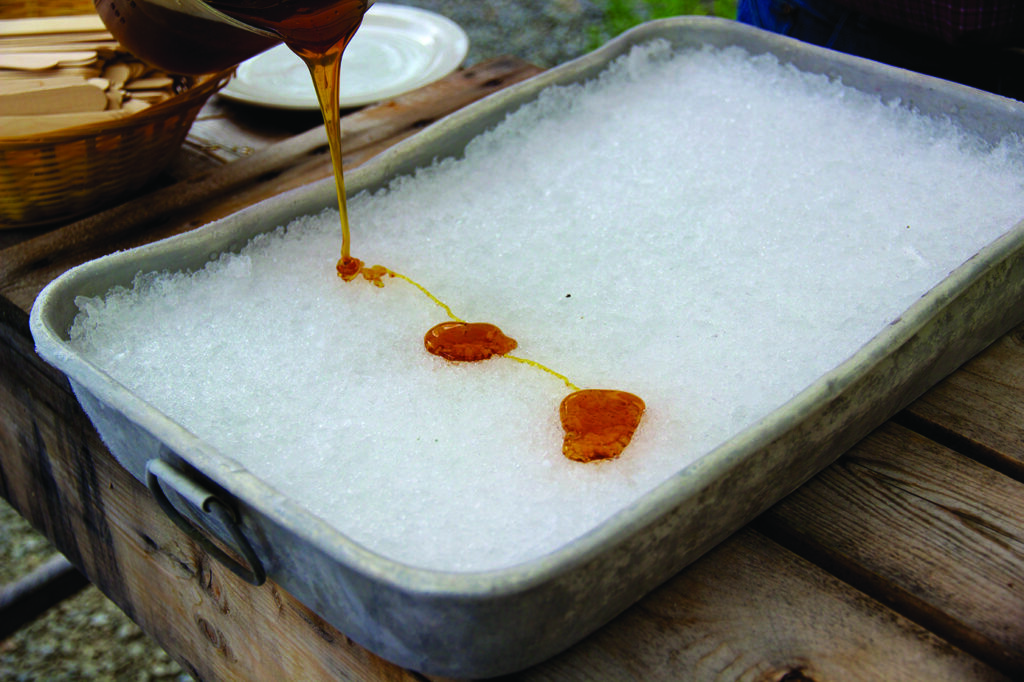
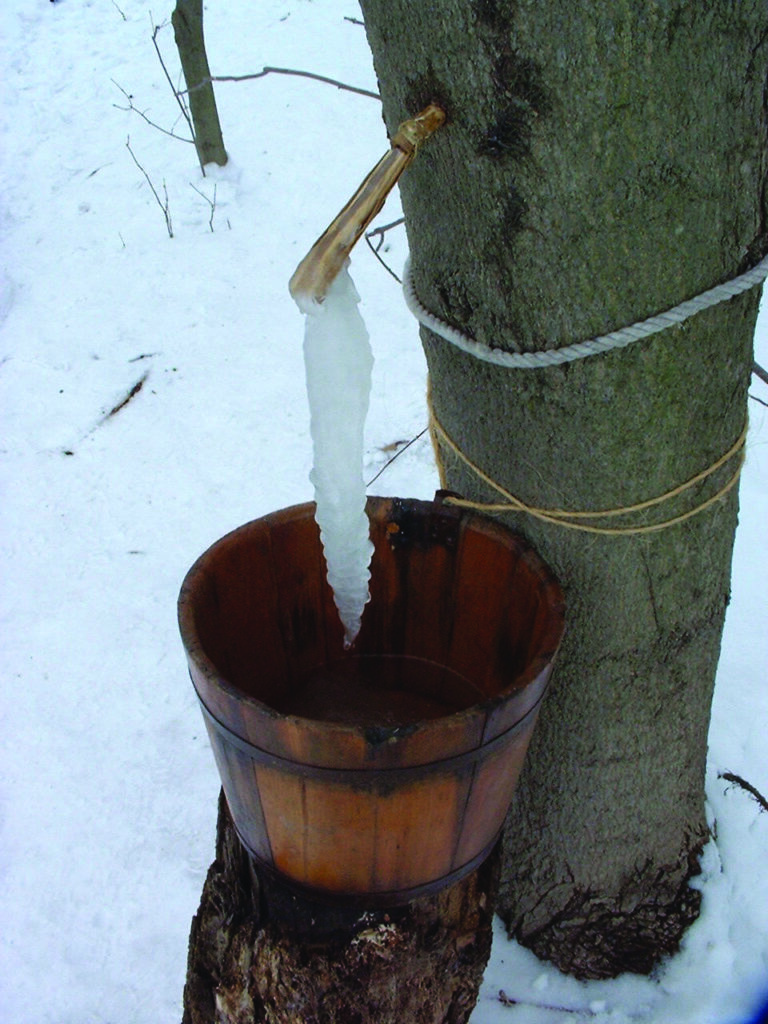
This classic maple syrup candy has been made by every generation of sugarmaker and is a kid favorite! Use your own pure maple syrup or heat up a store bought bottle.
Fill a pan with clean snow or shaved ice and keep frozen. Note: syrup needs to be boiled to a higher temperature than regular syrup boiling. Use prebottled and reheated syrup or just continue to the desired temperature with initial boil. For taffy consistency, boil syrup to 230°F and for more brittle, glass-like candy, boil to 252°F. Consistency changes within this temperature range. Once syrup has reached preferred temperature, immediately pour in ribbons on the snow or ice. It will instantly harden and should be eaten right away.
2large tart-variety apples, peeled and diced in small cubes
1cupdried cranberries
1tbspbutter
½tspcinnamon
½cuppure maple syrup (reserve approx. 2 tbsp for drizzle)
½tspbalsamic vinegar
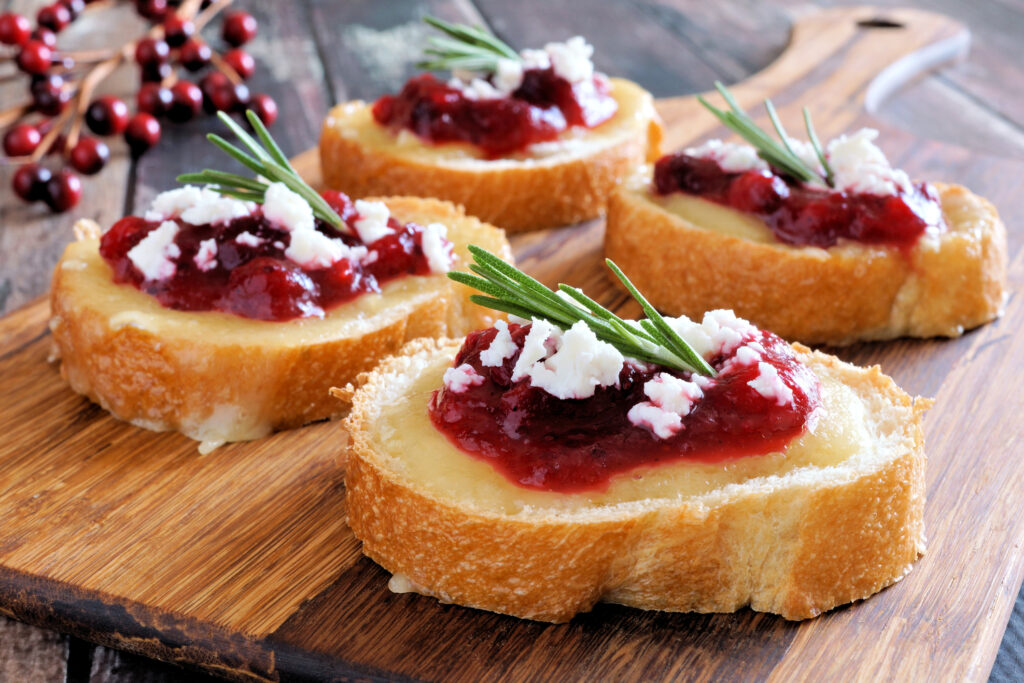
1roundbrie cheese, rind removessliced into thin rounds
olive oil
1/2cupfeta or goat cheese crumble
rosemary sprigs for garnish
baguette, thinly sliced
Method
Assemble first six ingredients for topping and preheat oven to 375°F.
Slice baguette and lightly brush slices on both sides with olive oil and arrange on baking sheet. Bake for approximately 3 minutes, flip and bake another 2 minutes until bread is lightly toasted.
While bread is toasting, melt butter in sauté pan and add apples and cook until tender. Add cinnamon, syrup, and cranberries and cook for another 2 minutes. Finally add balsamic vinegar and warm through.
Keep topping warm until toasts are ready. When bread is done, remove from oven, put on slice of brie, scoop on topping, sprinkle with feta crumbles, garnish with sprig of rosemary, and drizzle with extra syrup. Serve warm.
Notes
To make ahead: pretoast bread and make topping. Right before serving, keep cheese at room temp and reheat the topping before assembling.
Combine marinade ingredients (keep back the extra 2 TB of syrup) and whisk together in small bowl.
Cover pork tenderloin with marinade and refrigerate for at least 3 hours.
Preheat oven to 400°F or heat grill to medium high heat.
Remove tenderloin from marinade (discard marinade.) Place in roasting pan or directly on grill, brush with remaining maple syrup, and cook uncovered for approximately 8 to 10 minutes.
Flip tenderloin over and cook for another 10 minutes or until a meat thermometer reads 150 ˚F at the thickest portion of the loin.
Remove from oven, wrap loosely in tinfoil, and let rest for 5 to 10 minutes. Slice into medallions.
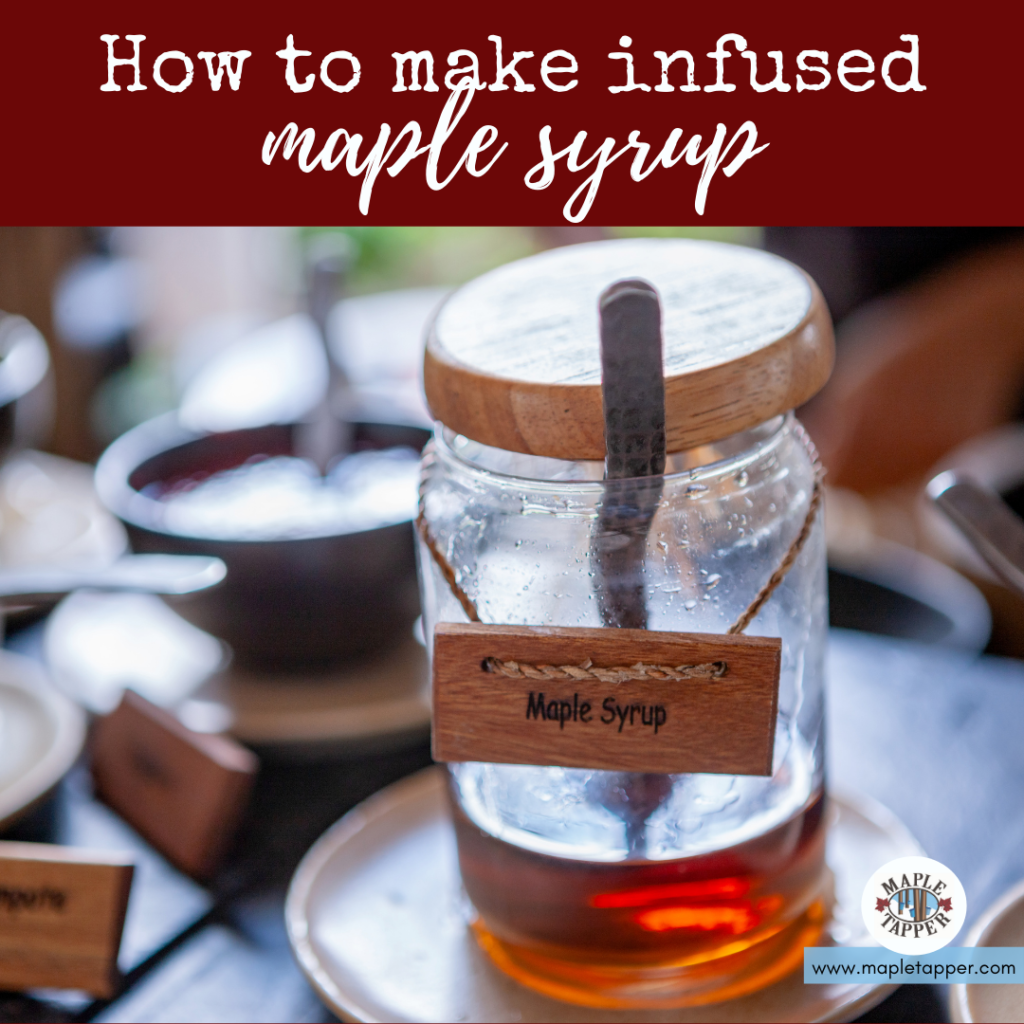
While we all love the taste of pure maple syrup, it’s also fun to play around with blends and change it up a little bit. Infusions are so hot right now, we thought we’d try it with our syrup. We hit up our friends on maple tapping blogs and social media channels and this is the method most seemed to agree on. Definitely try this in small batches until you’re sure you like it. And don’t choose infusion ingredients that could spoil while in the syrup (i.e. fresh fruit or things that might break down and be difficult to strain out).A few fun ideas: vanilla beans, coffee beans, or cinnamon sticks (lightly scrape or crush them to release flavor); whole nutmeg, star anise, peppercorns, or cloves; even dried chili or chipotle peppers. We recommend putting your ingredients in a tea infuser or wrap in cheesecloth to make it easier to remove them.
Instructions
Make syrup as usual, getting it to 219°F and filtering as you always do, and reserve the amount you intend to infuse.
Into this set aside jar, add your extras. Let steep for about one hour – taste at the half-hour mark for flavor intensity.
Remove the ingredients, reheat syrup to at least 180°F, filter if desired to remove sugar sand, and seal as usual.
For a fun presentation, drop a vanilla bean (or cinnamon stick) in the jar before sealing.
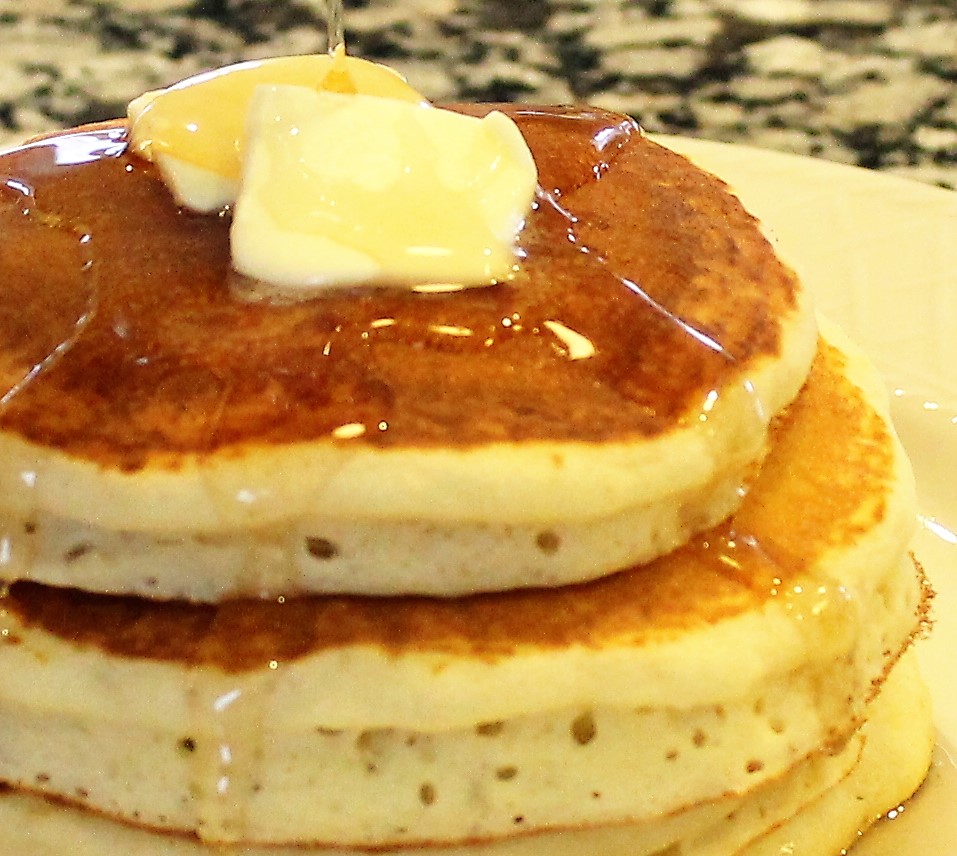
Golden syrup drizzling down over hot buttered pancakes with a strawberry garnish.
Of course, your first meal of homemade maple syrup just has to be a big stack of pancakes! This is what you worked for all season and it tastes so good. After you’ve had your fill of flapjacks – and still have a pantry full of pure maple syrup – you’ll want to venture past the breakfast table.
Pure maple syrup can easily be used as a replacement for sugar but obviously it will impart a maple flavor to your dish. Generally, one cup of pure maple syrup equals one cup of sugar and can be swapped out in most recipes. For cookies and cakes that also use liquid ingredients, just reduce the liquids by three tablespoons for each cup of maple syrup used.
We’ll add a couple recipes each week during the season and send out a link in our newsletter. If you’d like to get these yummy recipes (and our really helpful newsletter!), click here.
Because sugar was scarce but sugar maple trees abundant in pioneer days, many of their sweet treats were made from maple syrup – and those recipes are still good today. Try some of these this year, you can use already-bottled syrup or make them during your initial boiling phase. Be sure, though, to calibrate your thermometer each time you boil syrup (click herefor how to do that).
Granulated Maple Sugar. On a non-humid day, heat syrup to 252°F to 257°F (or 40°F to 45°F above the boiling point) and transfer immediately to a flat pan. Stir within this pan until it becomes granulated and all the moisture is gone. Sieve through a coarse screen (1/8-inch hardware screen) to create uniform granules. Use as a one-to-one white sugar replacement.
Hard Molded Sugar. Follow the same steps for granulated sugar but do not put through a screen. Instead pack into candy molds – be sure to follow the manufacturer’s directions on prepping and cleaning the molds.
Molded Soft Sugar Candy. Heat syrup to 245°F (or 33°F above the boiling point,) pour into a flat pan, and allow to cool undisturbed to 200°F but no lower than 160°F. Once it drops to this temperature, stir until the syrup is soft and pliable and pour or pack into molds. When cool, poured candies will have a glazed surface.
Hard Maple Sugar Candy. Boil the syrup to 240°F to 242°F (or 28°F to 30°F above the boiling point.) Keep at least 1½-inches of liquid in the pan to avoid scorching. Allow to cool to 150°F and pour or pack into molds.
Jack Wax or Maple-on-Snow.Kids will love this one! Start out by filling a pan with clean snow or shaved ice and keep frozen. The boiling range is wide for this treat: at the low end of 230°F (or 18°F above the boiling point) you’ll get a taffy-like candy while at the high end of 252°F (or 40°F above the boiling point) you’ll have a glass-like candy. Consistency changes within this temperature range. Once your syrup has reached your preferred temperature, immediately pour it in ribbons on the snow or ice. It will be done instantly and is typically eaten right away, as it does not keep well.
Have you been wondering if it would be faster to freeze the water in your sap instead of boiling it down? We’ve all found our sap buckets with chunks of ice after a really cold night and we know that ice is mostly water, so why not just toss it out and save time evaporating it during boiling? Early sugarmakers did just that mostly because they didn’t have access to heavy-duty tools that would stand up to high heat. Large modern day sugarmakers are using freeze concentration in their operations to save time. If you’d like to try it out this season, this article will highlight the hows and whys of freezing sap and we’ll begin with this author’s unscientific freeze experiment.
Because necessity is the mother of invention . . .
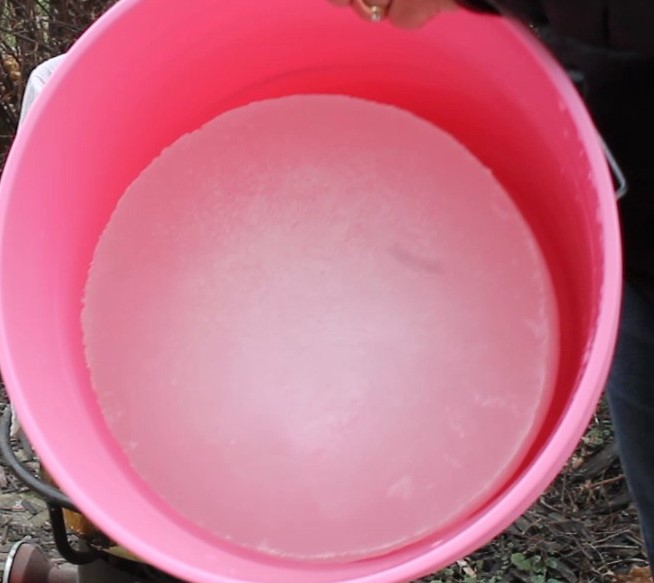
I tried my very own freeze experiment in 2015 mostly because it was an abysmal sap year and I wanted to boil all my sap at once at the end of the season. I only gathered about 20 gallons of sap in 2015 so as I collected it, I filtered it, and froze it in five-gallon-buckets. It was cold enough outside that we just put the buckets in the shade and banked them with snow. Sure enough a big block of ice formed in each bucket. When I was ready to cook, I let the buckets thaw a bit and poured the liquid into my pot. As you can see from these pictures this left a lot of ice in the bucket. I boiled my syrup as usual and ended up with the standard yield of about 40-to-1.
But while I was boiling my first batch of sap, those big chunks of ice melted. I just couldn’t help myself so I boiled these former ice chunks down and do you know what? I ended up with more syrup but it was probably closer to a 50-to-1 yield. So in my unscientific judgment, freezing did work somewhat to concentrate the sap but if I would have thrown out that ice, I would have lost about a half-quart of syrup!
Now I’m not saying it doesn’t have merit and if you can freeze your sap outside, you would use zero energy for at least part of your concentrating steps. One way to try this would be to use a multi-stage freeze/thaw method where you let the ice chunks melt, then pour off the liquid to boil, and then start the freeze/thaw/cook method over again.
One thing everyone agrees on, though, is you still must boil your sap to achieve the caramelized color and flavor we all love. Besides it has to be heated up for bottling anyway and there’s no way around that!
A more proven freeze method.
Beyond this backyard trial and error, the professionals have been working out a way to freeze the water in sap as it flows through the lines into the sugar shack. The upfront cost and set up of these systems is not really feasible for the hobbyist but it’s interesting to take a look at the method. Typically at the end of the mainline but before the storage tank, the sap is run through a refrigerated pipe. The water freezes, concentrating the sap which continues to flow through into the storage tank for boiling. The ice is melted and drained off.