How to Calibrate a Syrup Thermometer

thermometer in boiling maple syrup
Thermometer in boiling syrup

Because the syrup-making process relies so heavily on an accurate temperature reading, it’s best to calibrate your thermometer before each day’s boiling session. Readings can be affected by barometric pressure, by altitude, by mishandling of the thermometer (yes, we’ve all dropped ours!), or even if you’re using a brand new thermometer.  

The purpose of calibrating it is to find the temperature at which water begins to boil — normally this is at 212°F for most maple tapping altitudes. (If you live at higher altitudes check online for your normal water boiling temperature.) Once you know your thermometer’s reading, you can then add 7° to determine your syrup’s finish point of 219°F. For instance, if your thermometer shows a temperature of 213°F when water boils, you’ll know it is off by +1°F, so you’ll know to boil the sap to 220°F (as shown on your thermometer). Don’t worry, you’ll figure it out! 

How to calibrate a thermometer:

1. Place your thermometer in a pan of distilled water making sure to have 2-inches of room on all sides and up from the bottom of the pan. Make sure you start with enough water to keep your thermometer’s bulb or reading tip submerged for five minutes even as water evaporates.

2. Heat distilled water to a rolling boil. Leave thermometer in boiling water for five minutes, remove from water, and hold at eye level to read temperature.

3. Take note of temperature in relation to baseline: If it is +/- 212°F, add or subtract this range to your finish boil target temperature as described above.

If you get wildly different readings each time you calibrate your thermometer, you can safely assume this thermometer is no longer reliable you should buy a new one.

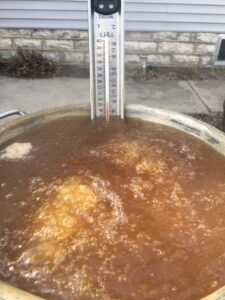
Our Ultimate Tapping Kit (order here) includes a thermometer like the one shown here — you can also use a digital one or a standard glass thermometer. Just make sure it has marking or readings to one-degrees.

How to Filter Sap

Sediment (sugar sand or niter) in maple syrup.

If you’ve ever seen sediment, cloudiness, or even chunks of sugar in your pure maple syrup, you know what sugar sand (aka niter) is! This is a perfectly edible (and natural) component of syrup but it can easily be removed with filtering. Most sugarmakers filter sap and syrup three times and this article and video describes that quick and easy process. Be sure to use professional filters designed for syrup making (not coffee filters, cheesecloth, or dish towels).

Filters are inexpensive and reusable so it’s a one-time purchase as you get started. We use one-quart filters which are a more manageable size for the home sugarmaker. They fit perfectly into a standard sieve stand and have small slits in each side so you can thread a dowel through and easily balance on the sieve stand so you have both hands free for pouring hot syrup. 

Filters are included with many of our kits but you can also buy them separately here.

Note: If you’re making black walnut syrup, don’t use the Orlon or a similarly thick filter. Walnut sap contains more pectin than maple sap so it’s too thick to run through this type of filter. Try cheesecloth or a thin strip of clean muslin.

This short video shows the entire process: 

Filter #1: This step is done each day as you collect sap to remove debris that may have fallen into your sap bucket (one more reason to use a closed lid system!). Suspend the thinner prefilter over a clean bucket and slowly pour the sap through to seine out debris. When done, rinse this filter with plain hot water, air dry, and save for later. Refrigerate or freeze the sap until ready to boil.

maple-syrup-final-filter-one-quart-julie-fryer-maple-tapper.jpg

Filter #2: This step occurs midway in the boiling process as sap reaches a temperature in the 215°F range. At this point, concentrated sap is moved from the larger pan or evaporator and poured through a thin prefilter into the finishing pot. This removes the majority of sugar sand which can make syrup cloudy.

Filter #3: The third and final filter is done after the sap has reached its finished temperature and is poured into bottles. For this filtering, put the thinner prefilter inside the thicker Orlon filter.  Slowly pour the finished sap through these filters and into clean, hot bottles or jars. Syrup is now done!

Cleaning Filters. As mentioned earlier, these filters are reusable and should last for years if cared for properly. Never wash with detergent or dish soap as this can affect the flavor of finished syrup. After use, simply rinse well in hot water and hang to dry. Do not wring or twist the filters as this can tear them or alter their shape.

 If you’d like to learn more about entire boiling process, click over to this helpful article, “How to Make Maple Syrup.”